October 02, 2009 update:
A newer version of the Cleon, Cleon II, is available for all Nikon digital SLR cameras (with the exception of the entry level models such as the D40, D40X, D60 and D3000) — read my brief review on the Phottix Cleon II.
There is also an entirely new remote, the Phottix Plato, which operates on a much higher, more powerful and more consistent frequency — read my brief review on the Phottix Plato. Again, the Plato has the necessary connectors for all models of Nikon digital SLR cameras except for the entry level models.
End update.
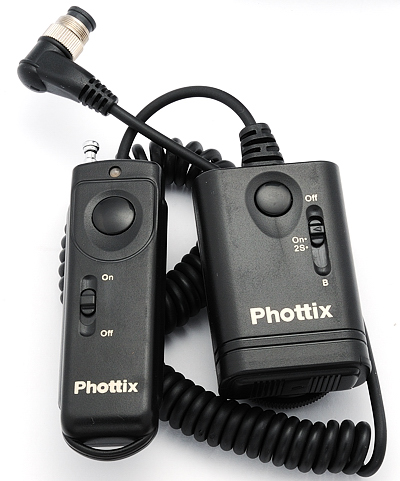
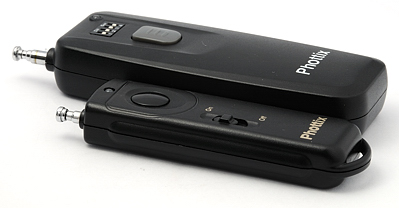
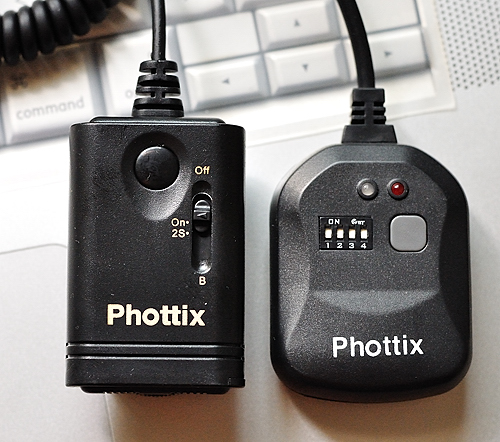
The Phottix Cleon N8 remote control set consists of a transmitter and a receiver, and works flawlessly with my Nikon D300.
In the photo below, the transmitter is on the left, while the receiver is on the right.
For owners of the D90 and D5000, the correct version to purchase is the Cleon N10, while the users of the D80 and D70s should get the Cleon N6.
Where to buy the Phottix Cleon N8, Cleon N10 and Cleon N6
The Cleon N8 is available on eBay and is sold by Titanium Powerseller HKSupplies, an eBay seller, the same folks who bring you the Phottix Wireless Set N8 (previously known as N1), which I reviewed here).
The Cleon remote is also available for other digital SLR cameras, with the only difference being the connector on the receiver is adapted to the terminal of the camera:
- Cleon N10 (on eBay) for the Nikon D90 / D5000
- Cleon N6 (on eBay) for the Nikon D80 / D70s
- Cleon C6 (on eBay) for the Canon Digital Rebel XSi (450D), XT (350D) / XTi (400D), Pentax K20D / K200D / K10D / K100D
- Cleon C8 (on eBay) for the Canon 50D / 5D Mark II / 40D / 5D / 1D and 1Ds series / 30D / 20D
As of the date of writing, the Phottix Cleon isn’t officially available for sale from the merchant, HKSupplies. However, as reported by numerous customers in this forum thread, they initially made a purchase for the older Phottix N1, but were pleasantly surprised when they received the upgraded Cleon instead, at no extra cost. You might want to contact HKSupplies (you’ll be asked to create a free eBay account, if you don’t already have one) and raise the question of whether you would get the Cleon if you placed an order for the N1 now.
So, search ebay for Phottix N1 and purchase it to receive the Cleon. I’ll update this section as soon as the Cleon is officially displayed in the ebay listings.
The Cleon is a significant update to the N1, and is designed to work with any Nikon or Nikon-compatible camera that has a 10-pin remote socket. Some examples include:
- D3, D3X, D700
- Nikon N90s
- F5, F6, F100, F90, F90X
- D1, D1H, D1X
- D2H, D2Hs
- D2X, D2Xs
- D100 with MB-D100
- D200, D300, D300S
- Kodak DSC-14N
- Fuji S3 Pro, S5 Pro
Before going into the details, here’s a quick list of improvements found in the Phottix Cleon remote over the older Phottix N1:
- Hybrid design allows for wired or wireless operation — I don’t know of any other remote out there that has this capability.
- When used as a wired remote, no battery is required. This is especially handy if you’re operating the camera in countries which have strict regulations on the use of radio frequencies. Using the Cleon receiver purely as a wired remote allows you to get around this restriction.
- The B position of the slider switch makes the receiver a HDR shooter’s dream — I’ll explain why in a bit.
- The transmitter unit is now physically much smaller, a boon to photographers who don’t like unnecessary bulk in photographic accessories.
Video clip on using the Phottix Cleon
I’ve created a 3-minute 14s video on using the Cleon, which is embedded below. You can view the larger version here. Hopefully, you’ll be able to appreciate how well the remote works and the functionality that comes with it.
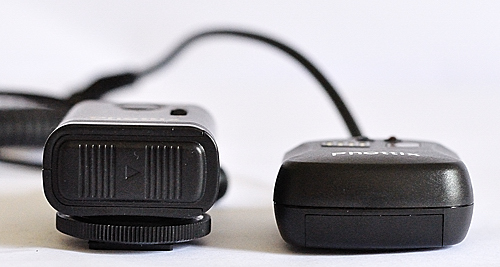
The Cleon Receiver
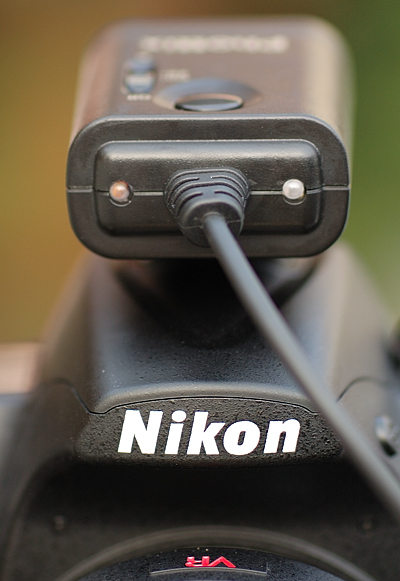
Like its N1 predecessor, the receiver has a 10-pin connector that plugs into any Nikon film or digital SLR camera having a 10-pin remote terminal.
The Cleon 10-pin connector
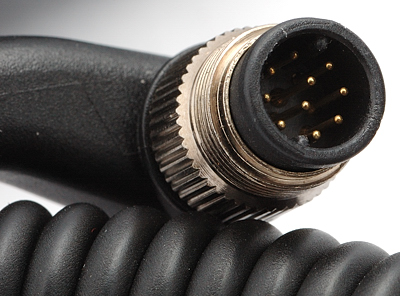
Impressively for an inexpensive product, the connector has a locking collar that screws on to the remote terminal on the camera body for a tight fit.
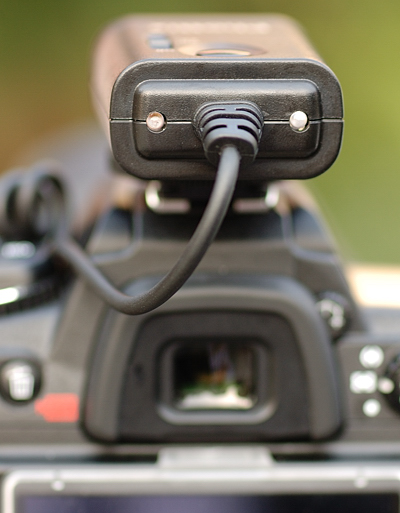
10-pin connector side-by-side with the remote socket on my D300

10-pin connector plugged in
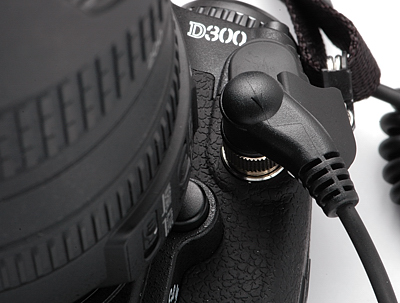
Note that the head of the connector is designed to angle away from the lens release button. This ensures that there is no interference with the operation of the button, and you have sufficient space for your fingers to work the button if there’s a need to.
The receiver component gets the biggest updates when compared with the previous Phottix N1 unit.
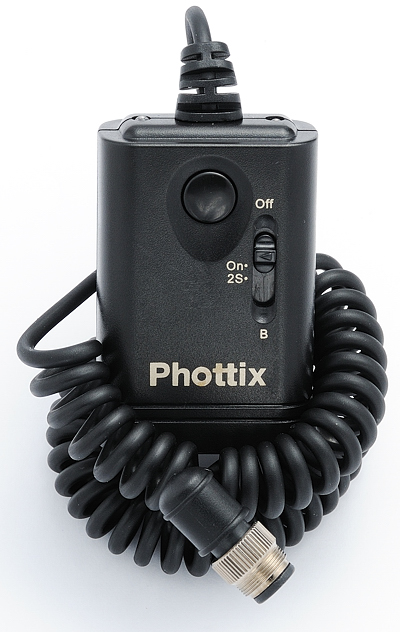
The Phottix Cleon receiver in wired mode
This, in my opinion, is the biggest improvement the Cleon has over its N1 predecessor. The receiver unit can now operate as a wired remote. Yes, that means you can use just the receiver unit to activate the camera’s autofocus and shutter; you don’t need to use the transmitter if you don’t want to. You don’t even have to purchase an additional wired remote. And, you don’t need a battery to operate the Cleon in this mode.
The Cleon receiver, top view
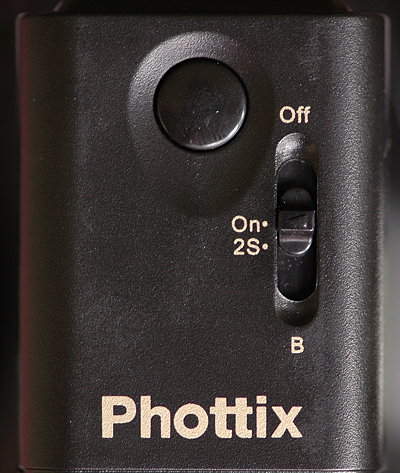
For normal wired operation, simply use the button on the receiver. There are two distinct positions — a half-press and full-press. Half-pressing the button activates autofocus on the camera, while pressing the button all the way down takes the picture — exactly how the camera’s shutter button itself works. The feel of the button is better with the Cleon than the one on the older N1 transmitter which didn’t provide enough tactile feedback on whether the button is half or fully-pressed.
There is also a slider switch with four positions — Off, On, 2S (two-second delay) and B. In the wired mode, there is no functional difference between Off, On and 2S, meaning that pressing the button when the slider switch is in any of these positions will activate the shutter.
The B position is interesting. Suppose you want to fire off a sequence of high speed shots in Continuous mode, whether bracketed or not. Bracketing this sequence of shots implies you intend to use them for HDR (high dynamic range) photography. If you slide the switch all the way to the B position, the camera continues firing just as if you had pressed and held down the button. This is a convenient feature for photographers who don’t relish the thought of putting too much pressure on the thumb while taking multiple bursts of 9-shot bracketed sequences.
After the shots have been fired, you must slide the switch away from the B position in order to either resume normal control of the camera (such as image review), or to take another burst sequence by sliding the switch to B again.
Because the B position simulates a full press of the shutter button, you’ll need to know how you’ve set up your camera for shutter release priority. For instance, if you’ve set the camera up for release priority, sliding the switch to B will cause the camera to take the shot first, and then autofocus next. Of course, if you’ve configured your camera for Focus priority, then switching to B means the camera will autofocus first, and then take a photo once focus is acquired.
The Phottix Cleon remote control set in wireless mode
Using the Cleon in wireless mode means two things:
- You need the use of both the transmitter and receiver
- The receiver needs to be powered by a battery
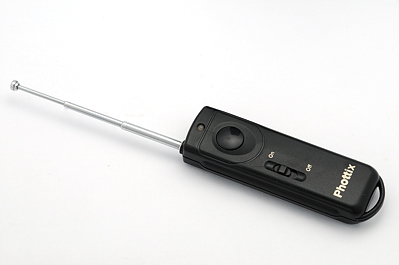
The Cleon transmitter
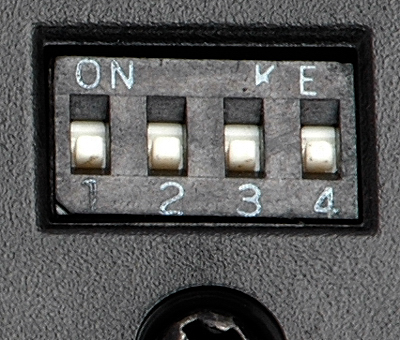
There are four channel selector switches on the back of each of the transmitter and receiver. Each switch can be set on one of two positions, up or down. You need to set the switches identically on both units in order to pair up the transmitter and receiver. These switches were provided to allow up to sixteen sets of Phottix Cleon remotes in the vicinity to operate independently. My set came with all the switches in the down position.

The lettering on the switches aren’t exactly top notch, but shouldn’t be cause for too much concern since all they do is provide a numerical identification for each switch.
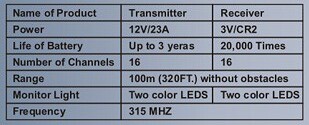
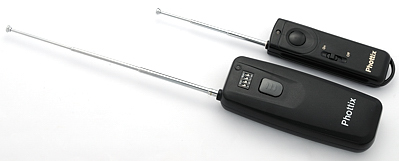
Communication between both the transmitter and receiver is via radio frequency at 315 MHz , so line of sight is not required. Claimed maximum range is 100 meters (320 ft) if there are no obstacles. The antenna of the transmitter can be extended as required.
The Phottix Cleon transmitter with antenna extended to the maximum length
The Cleon N8 operates at 315 MHz
There is one button, and an On / Off switch on the transmitter. Just like the receiver, the transmitter button has two distinct positions, a half-press and full-press. Again, the feel of the button is much better than on the older N1 — you can pretty much distinguish between both positions by feel on the Cleon; the feel is less distinct on the N1.
Folks who prefer a smaller transmitter (like me) will prefer the Cleon. In comparison, the N1 transmitter was much bulkier. The Cleon transmitter measures 9 cm / 3.5 in with the antenna retracted. The N1 transmitter measures 11 cm / 4.5 in. The Cleon is also less thick and not as wide.
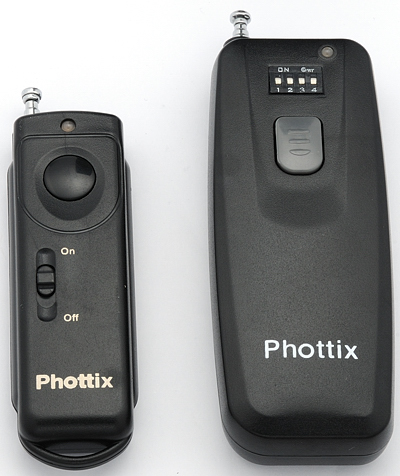
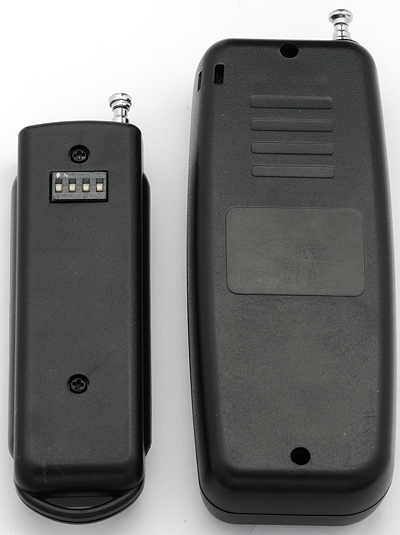
Here are some photos comparing the size of the Cleon vs N1 transmitter.
Thickness of transmitter — Cleon vs N1
Transmitter antenna fully extended — Cleon vs N1
Front view of transmitter — Cleon vs N1
Rear view of transmitter — Cleon vs N1
Claimed battery life for the transmitter is up to 3 years. Unfortunately, like the N1, there is no easily-accessible battery compartment. Unlike the N1 though, the screws on the Cleon are slightly larger and much easier to access.
The Cleon receiver
In wireless mode, the receiver needs to be powered by a CR2 lithium battery. On the packaging, the claimed battery life is “20,000 times”, which I take to mean as 20,000 actuations.
CR2 lithium battery for the Cleon receiver

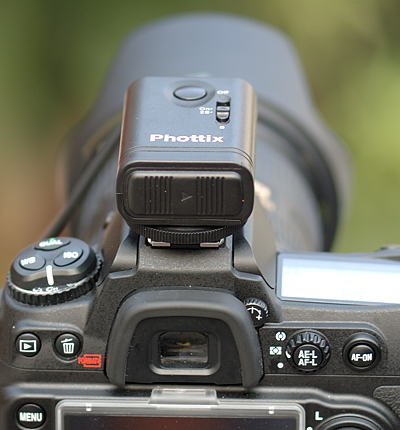
The Cleon receiver can optionally mount on to the flash hotshoe of your camera. You lose the ability to use the internal popup flash or external flash when the receiver is mounted this way.
The Phottix Cleon receiver has an adapter for mounting on to a flash hotshoe

Cleon receiver on the flash hotshoe — top view
Cleon receiver mounted on flash hotshoe — side view
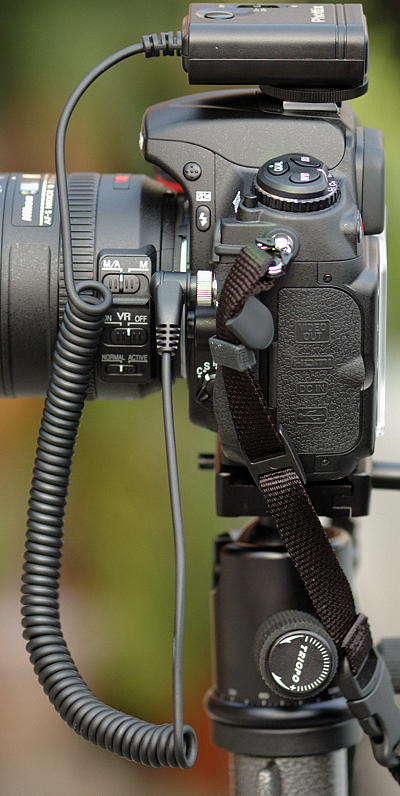
The cable on the Cleon receiver is much longer than the N1 unit, and is coiled. I find the Cleon cable a bit more convenient as I can stretch and wrap the cable around, say, the base of the lens to prevent it from flopping around when I don’t mount the receiver on the hotshoe.
The adapter is non-directional, meaning you can mount the receiver with the battery compartment facing you (status LEDs face the subject) or with the status LEDs facing the back of the camera.
Cleon receiver on the hotshoe — status LEDs facing front
Cleon receiver on hotshoe — status LEDs facing rear
Receiver size comparisons
Here are two photos comparing the relative sizes of the Cleon N8 vs the N1 side-by-side. When viewed from the top, the Cleon N8 receiver looks slightly longer and slimmer. The addition of the flash hot shoe adapter on the N8 means that the receiver is about a quarter of an inch taller than the N1 receiver, when viewed from the rear.
BULB Exposures
Long exposures are a cinch with the Cleon. You can take BULB exposures in either wired or wireless mode.
First, put the camera into BULB mode. On the D300, this means setting the camera in M mode and choosing a shutter speed of BULB.
Then, if using the Cleon in wired mode, simply slide the switch to the B position. This opens the shutter and the exposure is initiated. To terminate the exposure, simply slide the switch away from the B position. I normally just slide it back all the way to Off. Remember that the receiver does not require battery power for this operation.
If you wish to go the wireless route, first slide the receiver switch to On (the battery is required). Then press and hold the transmitter button for 3 seconds or more — the shutter opens and the exposure is initiated. During the first 3 seconds, the LED on the transmitter glows red.
After 3 seconds the transmitter LED will turn off — this is a signal to you that you can let go of the button. The camera’s shutter continues to remain open, and there is no need to hold the button down for the entire duration of the exposure (I’m stating the obvious just to make things clear).
To terminate the exposure, simply half-press the transmitter button and let go — you’ll see the transmitter LED flash green briefly, and the shutter closes.
Sample photos and applications
One of the greatest convenience afforded by the Cleon is I can now include myself in group shots — click the thumbnail below for more information and larger images.
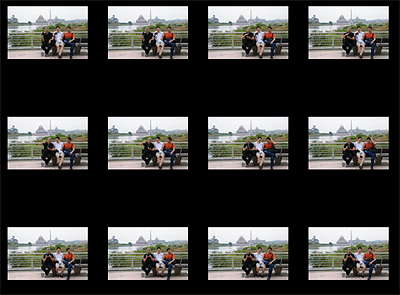
Because the Cleon trips the shutter directly (and wirelessly), I no longer need to set and re-set the self-timer. Multiple shots can be taken easily from wherever I stand.
Anytime you feel like not gluing your right finger to the shutter button to trip the shutter, use the Cleon remote. One example is when you’re activating the mirror-lockup function on your camera in order to minimize camera shake.
Another example is if you’re trying to grab a self-portrait. You know how difficult it is to hold your DSLR in one hand and trying to trip the shutter. In the photo below, my left hand is resting on the table behind me and holding the transmitter. My right hand held the D300 plus Tamron 28-75mm and framed the picture. It was super easy to trigger the shutter using the remote without having to contort my hands and fingers.

Where to buy
The Phottix Cleon N8 is sold on eBay.
Remember that if you’re using the D90 or D5000, the correct version to get is the Cleon N10, also sold on eBay.
Owners of the D80 / D70s should get the Cleon N6, which is sold on eBay.