Latest update: A new, updated remote, the Phottix Cleon is now available. Read my review of the Phottix Cleon N8.
Just like the Phottix Wireless Remote Set N8 (previously known as Phottix N1), the new Cleon is compatible with all Nikon cameras such as the D3X, D700, D3, D2X / D2Xs, D300, D200, D80 and D70s.
Get the Phottix Wireless Remote Set N8 on eBay instead of the Cleon if you prefer the lower cost unit and don’t require the more advanced features on the Cleon.
After examining various options for remotely controlling my Nikon D300, I finally decided to buy the Phottix N8 wireless remote control set off eBay.
It’s hard to argue with having to only pay $37.00 USD (shipped, and the remote is cheaper for other makes of cameras — see the Where To Buy section towards the end of this article) for the Phottix Wireless Remote Set N8 which is available on eBay (interestingly, the $59.95 Opteka Wireless Radio Remote Release for Nikon D700, D3X, D3, D300, D200, D100, & D2x SLR Digital Cameras sold at Amazon looks exactly like the much cheaper version I bought), which I purchased from etefore, an extremely reliable merchant. Positive reviews on the product and the merchant from satisfied owners at DPReview.com helped a lot too.
I had four requirements for a remote trigger:
- Must be easy to take BULB exposure with.
- Must be light and small.
- Must be able to operate in wireless mode, so that I could, for instance, include myself in a group portrait and trigger the D300’s shutter from where I stand.
- Must be low-priced.
The Phottix Wireless Remote Set N8 fulfills all four requirements nicely.
Exactly a week after placing the order with the eBay merchant, I received the set in the mailbox. Here is what you get in the package:
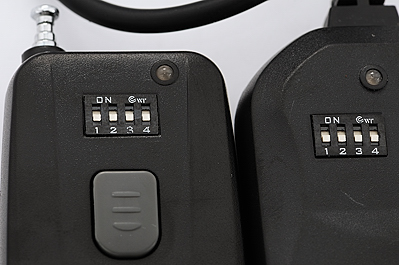
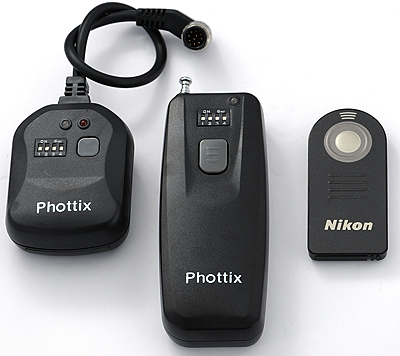
Phottix Wireless Remote Control — Set of Transmitter and Receiver

That’s the receiver on the left, and the transmitter on the right. This unit works with any of the mid to higher range Nikon digital SLRs, including the D200, D2 and D3 series.
The receiver has a connector that must go into the 10-pin remote terminal on the Nikon D300, like so:
This is how the connector on the Phottix receiver looks like
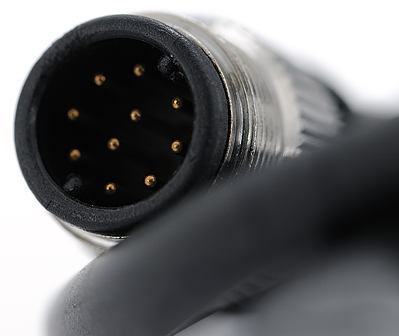
Open the cover of the 10-pin remote terminal on the Nikon D300

Insert the receiver’s connector into the D300’s remote terminal

The connector cable does not interfere with the operation of the lens release button

For a device that’s so cheap, it’s a pleasant surprise that a locking collar is available on the receiver’s connector. Screw this collar tightly in order to ensure a secure fit with the D300’s remote terminal. For now, I don’t use the locking collar — there’s no need to as the receiver is very light, and once connected, the fit is secure enough that there is no fear of the receiver falling off. I save a bit of effort this way.
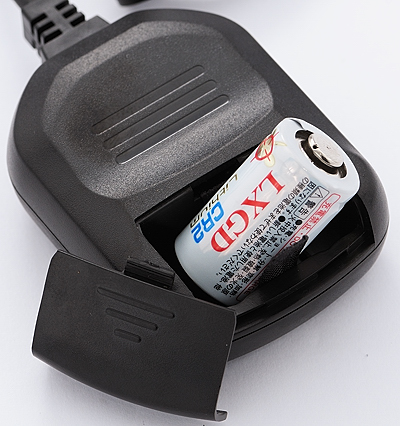
A CR2 lithium battery is required to operate the receiver, and is included in the package. Installation of the battery is easy enough, with a sliding cover for the battery compartment.
The transmitter has an antenna that can be extended. Communication with the receiver is via radio frequency, and the claimed operating range is 100 meters.

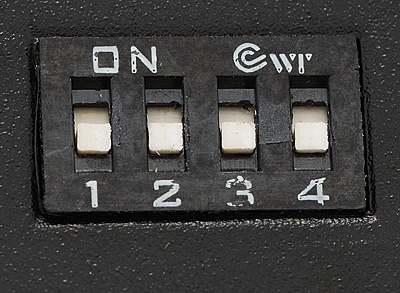
16 channels of communication is available, and you set it via 1 of two positions available for 4 switches labeled 1, 2, 3 and 4. The switches need to be set identically on both the receiver and the transmitter. The units arrived with all the switches already in the “Down” position as shown in the photo below — I did not have to change anything.
By the way, the build quality is good enough for me. If you have a macro lens and take a close-up of the lettering though, you might be less than pleased with the quality of the paint job :-) . In my opinion, this in no way detracts from the functionality of the unit as the lettering is used only to label the channel selector switches. It’s easy enough to identify which switch is which without having to rely on the labels.
How to operate the Phottix remote control
In order for the remote control to work, the receiver must first be switched on by pressing the only button found on the unit. Once this is done, the red LED on the right lights up.

Half-pressing the button on the transmitter simulates a half-button press on the Nikon D300’s shutter release button. In this instance, the left LED lights up and turns green.

Pressing down all the way on the transmitter’s button takes the photo. The left LED on the receiver turns red for an instant. If you’re shooting in BULB mode, the left LED continues to glow red until the exposure is terminated.

Demonstration: Using the Phottix remote control to operate the Live View on the Nikon D300 and take a long-exposure photo in Bulb mode
The button on the transmitter simulates the shutter release button on the Nikon D300. There are three positions:
- Unpressed (no battery power is consumed in this instance)
- Half-pressed, LED on the transmitter turns green: Depending on how your D300 is set up, this activates Auto Focus (AF). In handheld Live View mode, this flips the mirror back down for AF to take place)
- Fully-pressed, LED on the transmitter turns red: In normal exposure modes, this takes the picture. In BULB mode (or B mode), you must hold the button at this position for another 3 seconds until the red light on the transmitter goes out. Once the required time interval has passed, you just need a half-press on the transmitter’s button to bring the camera out of BULB exposure.
I have made a video clip showing how I used the Phottix remote control to operate the Nikon D300 in Handheld Live View mode, and also how I took a long-exposure photo with the D300 in bulb mode.
First, Live View was activated:

Then, I put the D300 into BULB mode:

Here’s the video clip (view a larger version) that explains how everything was done:
Sample Photos
I’ve taken quite a number of photos with the Phottix remote control, but I think this set of pictures shot at my Mother’s 61st birthday celebration shows just how convenient the remote control can be. I managed to include myself in the photos by first setting the D300 on a tripod and pre-focusing on the scene. I then mingled with the crowd and let them do whatever they wished, clowning around and posing occasionally. With the remote in my hand, I randomly took the photos by pressing the button every time I wanted a picture. For a larger version of the shots, please go here, but bear in mind that they had been converted from the NEF files at the “Good Balance” quality setting in Nikon View NX.
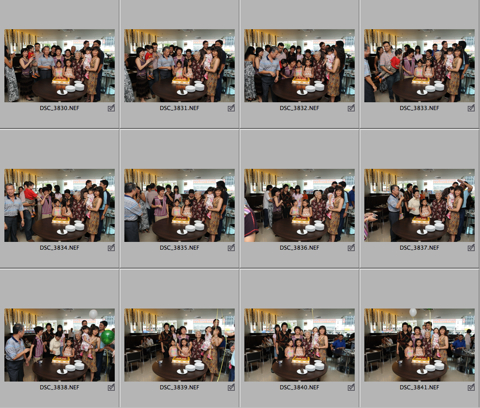
Using the Phottix remote at this event made me realize one strong advantage it has over using the InfraRed ML-L3 remote to control the Nikon D70 in remote mode. On the D70, every time the exposure meter times out and goes to sleep, the D70 would exit from the remote mode and you can’t use the ML-L3 to trigger the D70 anymore. I would have to walk over to the D70 and manually press a button and turn the dial to put the camera into remote mode again. This weakness on the D70 means you can’t take your own sweet time and trigger the camera as and when you like.
Despite the Phottix remote system being bulkier than the ML-L3, I now have a very strong preference for the way the remote control system as a whole is implemented on the D300. As long as you have the receiver plugged into the 10-pin terminal, you’re good to go and can trigger the D300 anytime you want — there’s no such thing as a timeout. Furthermore, connecting the receiver does not in any way interfere with the normal shutter button operations on the camera — you can continue using the camera’s shutter button normally.
Conclusion
I highly recommend this product for those who wish for an alternative to the Nikon-made remote controls. For a price that’s almost a steal, you get a fully functional unit that I daresay works much better than Nikon’s own (more expensive) products, such as the MC-30, which is a cable trigger, or the ML-3, which works with InfraRed (a hugely expensive device that does not have a locking feature for BULB photography, but has a trick function that allows the shutter to be triggered when a subject moves between the transmitter and the receiver).
Where To Buy
Search for the Phottix Wireless Remote Set N8 on eBay.
The Phottix Wireless Remote Set N8 remote is also available for other camera models. The only difference is in the connector type:
- Phottix Wireless Remote Set N6 (previously known as N2) on eBay, for Nikon D80, D70s
- Phottix Wireless Remote Set C6 (previously known as C1) for Canon 350D / XT, 400D / XTi and 450D / XSi
- Phottix Wireless Remote Set C8 (previously known as C3) for Canon 50D, 5D Mark II, 1Ds Mark III, 20D, 30D, 40D, 1D Mark III, 1Ds series and 1D series
Nice To Have
About the only wish I have for all remotes, be they of the Phottix brand or Nikon, is: Make It Smaller!
Much smaller, something like the size of the Nikon ML-L3 infrared remote control that’s made for the Nikon D40/s, D50, D70/s, and D80. In my opinion, that’s the best size to have for a wireless remote.
Below are some size comparisons:
Phottix remote vs Nikon ML-L3, top view
Phottix remote vs Nikon ML-L3, bottom view

Just for the record, the Nikon ML-L3 needs line of sight from the remote to the sensor on the front of the Nikon digital SLR mentioned above, and can only simulate a full-button press on the shutter release. The Phottix uses radio frequency for communications, which means you can position yourself comfortably anywhere relative to the camera, as long as you’re within a 100m radius (the caveat is that there must be no obstacles for this maximum range to be achieved).
Warning
The use of RF (radio frequency) devices is heavily regulated in certain parts of the world, where only certain frequencies are allowed or require a permit while others are forbidden outright. Read TOF Guy’s post on why there is a high likelihood that the Phottix remote cannot be used in France.