Here are steps to prepare your Nikon SB-600 for wireless flash operation.
How to put the SB-600 into remote mode
For Advanced Wireless Lighting, you need to activate the wireless remote flash mode on the SB-600.
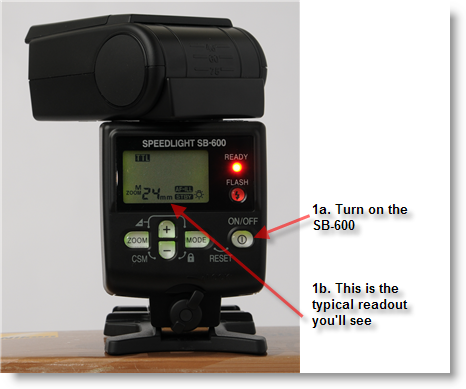
1. Switch on the SB-600 flash.
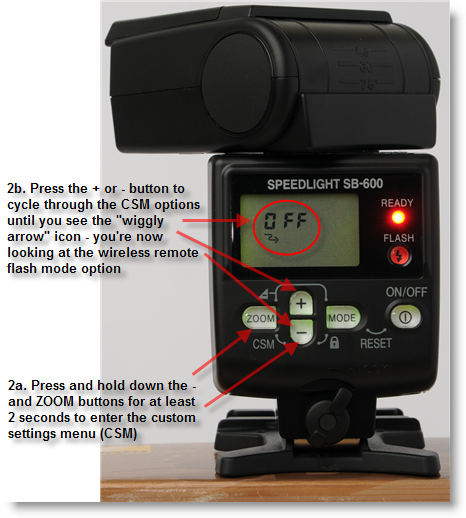
2. Go into the custom settings menu (CSM) by pressing the — (MINUS) and ZOOM buttons simultaneously and holding them down for two seconds. I prefer to press and hold the MINUS button first before I press and hold the ZOOM button. Once you’re in the CSM menu, press the — (MINUS) or + (PLUS) button to cycle through the available options until you see the wiggly arrow icon. This icon represents the remote mode, and has two values, OFF or ON.
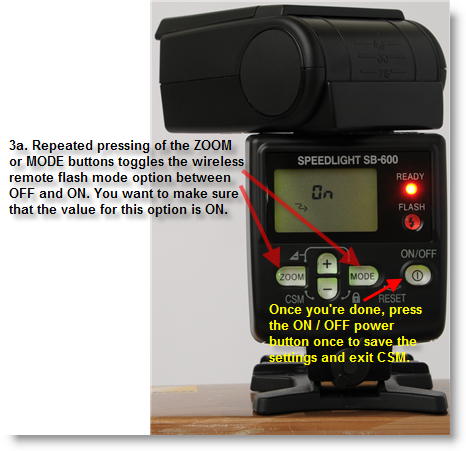
3. Use either the ZOOM or MODE buttons to toggle the wireless remote flash mode option between OFF and ON. Press once on the ON / OFF power button to save the setting value and exit the CSM menu.
4. Once you’ve exited from the CSM, you’ll need to set the CH and GROUP values. CH represents the communication channel your camera, SB-800 or SU-800 will use to communicate with the SB-600, so choose any number between 1 and 4. But if you’re using the built-in flash on the D70 / D70s to communicate with the SB-600, you’re restricted to using only Channel 3. If there’s another photographer in the vicinity who’s also using Nikon’s CLS (creative lighting system), make sure the both of you use different channels. If the SB-600 will be your primary remote flash, it’s usual to put it in Group A. For this example, a remote SB-800 was my primary flash and already assigned to Group A, so I put the SB-600 in Group B. With each speedlight assigned to a different group, I can control the flash output levels of my SB-800 and SB-600 independently of each other.

Now, set up the camera so that it can communicate wirelessly with the SB-600. For the following example, I’m using the built-in popup flash on my Nikon D300 to communicate and trigger the SB-600.
1. Press the menu button on the D300 and navigate to the Custom Setting Menu.

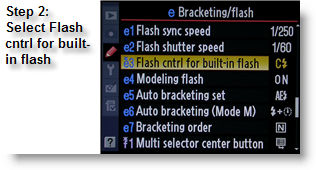
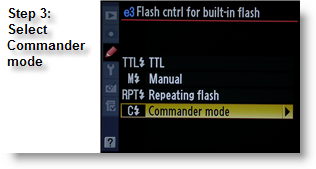
2. Next, select Flash cntrl for built-in flash. The default value for this option is TTL, but we’re going to change that in the next step.
3. Select the Commander Mode option. Now you will be able to wirelessly control one or more remote SB-600 / SB-800 flash units using the D300’s popup flash.
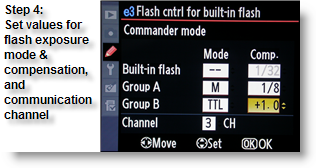
4. Set flash exposure modes and compensation plus communication channel options here. If you recall, I had my SB-800 assigned to Group A while the SB-600 was assigned to Group B. In this example, I don’t want the built-in flash to contribute any illumination to the scene, hence the double dashes (—). Group A (aka the SB-800) is on Manual exposure at 1/8. Group B (aka the SB-600) is on TTL with flash compensation of +1.0 EV. All this is achieved just by dialling in the necessary values here — I don’t have to go to each flash to adjust its output level or exposure mode. Finally, the Channel is set to 3 so that my camera’s popup flash can communicate with the other remote speedlights, which were also configured to Channel 3.
Related
Nikon Speedlight / Flashes / Lighting Tips — Main page.